
Skip to content

Website Help Center

How to Add a Section to Your Website

Adding a new section is an easy way to expand a page with more services, photos, testimonials, contact information, special offers, videos and other useful content. You can place the new section where it makes the most sense for your visitors, then personalize it to match your business.

Before you begin: Open the page you want to update in your website editor and scroll to the part of the page where the new content should appear.

Add a New Section in Five Steps

  1. Choose the location. Scroll to the part of the page where you want the new section to appear.
  2. Select “+ Add New Section.” Use the add-section control at that location on the page.
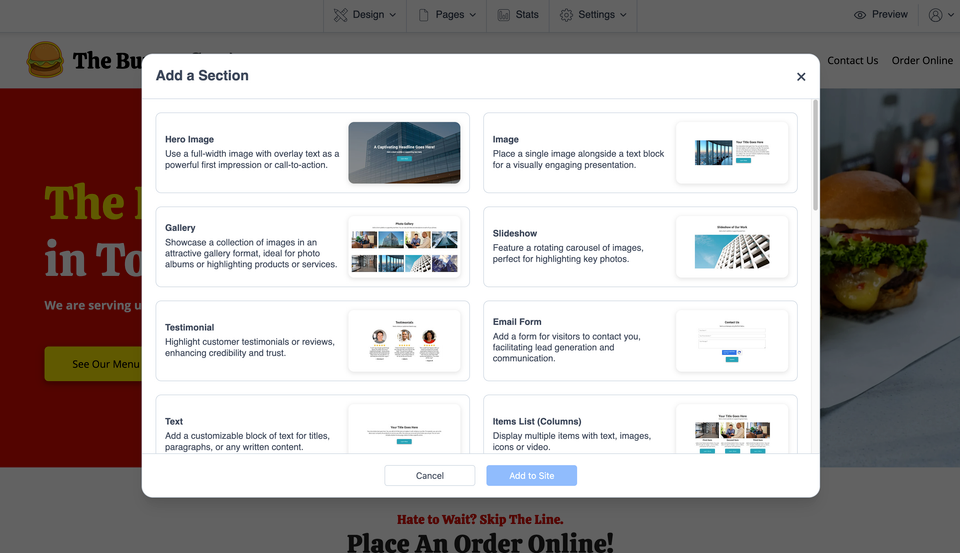
  3. Choose a section type. Select the type of content that best fits what you want to add.
  4. Select “Add to Site.” This places the selected section into your page.
  5. Personalize the new section. Edit its text, images and other ordinary content so it fits your business and the purpose of the page.

The screenshot below shows the add-section process in the website editor. After the section is in place, you can continue customizing its normal content using the editor.
H 014 s1 ss1

Which Kind of Section Should You Add?

Choose the section type based on what you want visitors to see or do. The website editor provides sections for common business content such as photos, services, testimonials, contact forms, offers, videos and more.

Photos & Media

  • Hero Image: Create a prominent image-led area with supporting text.
  • Image: Add an individual image with accompanying content.
  • Gallery: Display several photos together in a gallery.
  • Slideshow: Present multiple images in a rotating display.
  • Video: Add supported video content from services such as YouTube or Vimeo.
  • Audio: Add supported audio content when audio is useful to your visitors.

Services, Trust & Promotions

  • Items or Services List: Organize services or other repeatable items into easy-to-scan rows.
  • Testimonial: Feature customer feedback or reviews.
  • Price Table: Compare prices, packages or service options.
  • Coupon: Highlight a promotion, discount or special offer.
  • Event: Promote an event with its important details.
  • Menu: Present a structured list such as a restaurant menu.

Text & Page Content

  • Text: Add headings, paragraphs and other written information.
  • Columns: Arrange related text, images, icons or supported media side by side.
  • Document: Make an appropriate downloadable document available to visitors.

Contact & Connected Content

  • Email Form: Give visitors a way to contact your business through the website.
  • Social Icons: Connect visitors to your social media profiles.
  • Map: Display your business location on a map.
  • Facebook: Display supported Facebook content.
  • X (Twitter): Display supported X content.
  • RSS: Display content supplied through an RSS feed.

What About the HTML Section?

You may also see an HTML section for specialized code or third-party functionality. Custom code can affect how your website works, so contact Site Before Night Website Technical Help before using it for an advanced embed, integration or custom-code project.

Common Questions

Can I add a section in the middle of a page?

Yes. Scroll to the location on the page where you want the new content and use the “+ Add New Section” control there.

What happens after I add the section?

Once it has been added to the site, you can edit its ordinary content and personalize it for your business.

Which section should I use for my services?

The Items or Services List is designed for displaying multiple services or similar items in an organized format.

Keep Making Your Website Your Own

Adding sections is one of the easiest ways to expand and personalize your Site Before Night website. For more editing instructions, browse the Website Help Center. If you are looking for ideas about what to improve, explore Website Tips and Advice.