Skip to content
Website Help

How to Change Photos on Your Website

Your website editor includes tools for adjusting photos that are already stored in your Image Library. You can crop or resize an image, rotate it, apply a filter, add text, and make several other visual changes without leaving the editor.

This tutorial focuses on editing an existing Image Library photo. The steps below do not cover the separate process for uploading a new photo or replacing an image directly on a page.
Step 1

Open the photo you want to edit

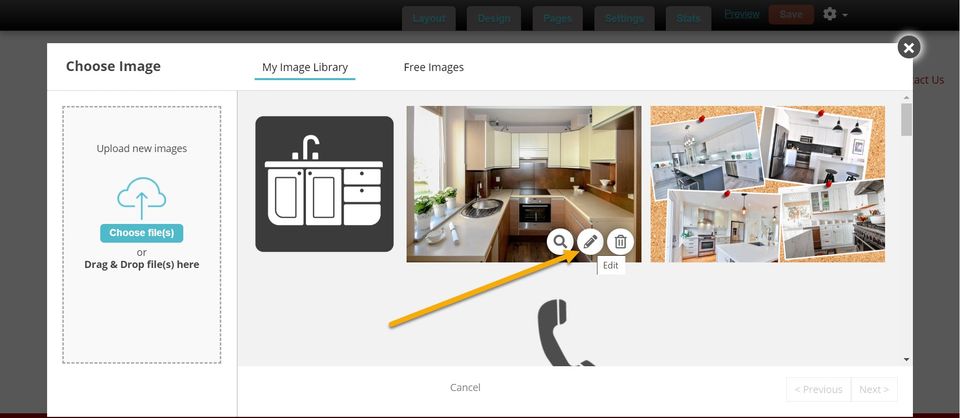
Find the image in your website's Image Library and select the pencil icon. This opens the image editor for that photo.

H 006 s1 ss1
Step 2

Choose the editing tool you need

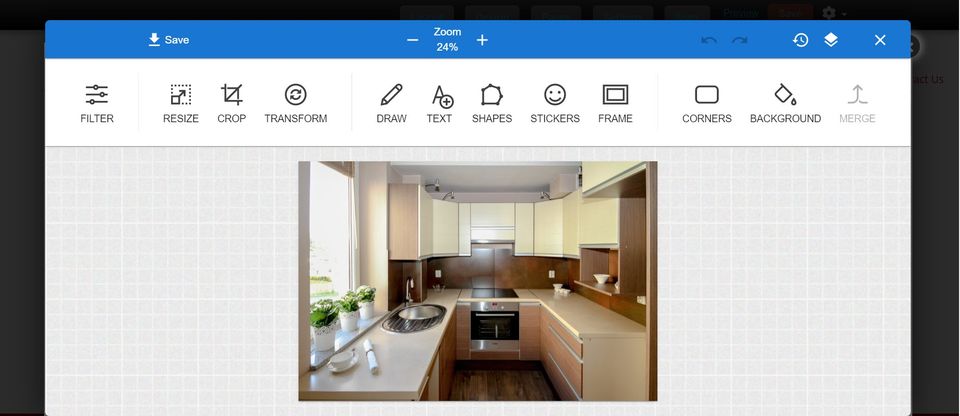
After opening the image editor, choose the option that matches the change you want to make. The available tools can handle common adjustments such as cropping, resizing, rotating, changing the color tone, adding text, or rounding the corners of an image.

You can also undo or redo recent changes and use the version-history control when you need to return to an earlier version of the image.

Tip: Make one purposeful adjustment at a time and check the result before moving on. This makes it easier to undo a change if the photo no longer looks the way you intended.
H 006 s2 ss1

What the image editing tools do

You do not need every tool for every photo. Choose only the adjustment that helps the image fit your website and communicate your business clearly.

Zoom: Change how closely you are viewing the image while editing.
Undo / Redo: Move backward or forward through your recent edits.
Version History: Return the image to an earlier saved version.
Filter: Adjust the overall color tone of the image.
Resize: Change the dimensions of the image by pixels or percentage.
Crop: Keep a selected portion of the photo and remove the area outside it.
Transform: Rotate or invert the image.
Draw: Draw directly on the image with your cursor.
Text: Add words directly to the image.
Shapes: Add common graphic shapes.
Stickers: Add small graphic elements to the image.
Frame: Add a frame around the outside of the image.
Corners: Change square image corners to rounded corners.
Background: Add background color when the image has a transparent background.
Merge: Combine the changes you have made into the edited image.

Apply and save your changes

  1. Select Apply after making an individual change you want to keep.
  2. When you are finished editing, select Save.
  3. Allow the editor a moment to create the edited image.
  4. The newly created image will appear on the top row of your Image Library.
Image-size note: For best results, the source guidance recommends using uploaded image files of 1 MB or less.

Common questions about editing website photos

Does saving an edit replace my original image?

The documented workflow creates a new image after you save your edits and places that image on the top row of the Image Library.

What if I make a change I do not like?

Use the Undo and Redo controls while editing. The image editor also includes a version-history option for returning to a previous version.

Can I crop and resize the same photo?

Both Crop and Resize are available editing options. Apply the individual changes you want to keep before saving the finished image.

What if the controls on my screen look different?

Website-editor interfaces can change over time. If you cannot find the controls described here or something is not working as expected, use Site Before Night's technical-help resources.

Keep working on your website

Visit the Website Help Center for more everyday editing guidance. For ideas on improving the appearance and content of your site, browse Website Tips and Advice. If you run into an editor or website problem, Website Technical Help is the best next stop.