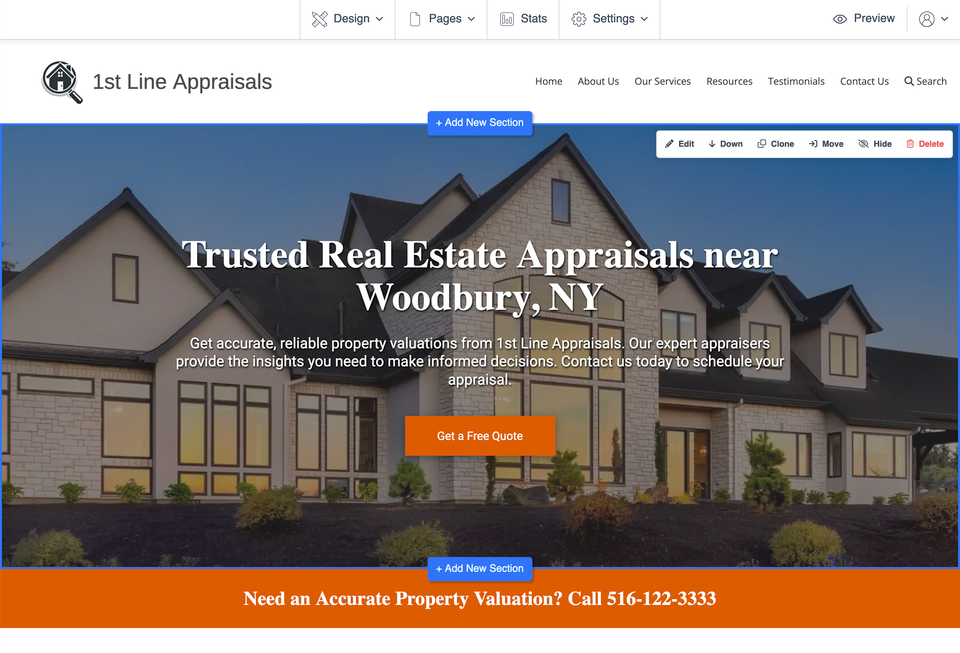
Each area of the editor has a different purpose. Understanding where changes belong makes it easier to update your website without accidentally changing something unrelated.
1
Design
The Design area controls the broader look of your website. Depending on the options available to you, this can include the layout, website header, brand colors, fonts, button styles, and site background.
Use these controls when you want to personalize the overall appearance rather than change the wording of one individual section.
2
Pages
The Pages area is where you manage the pages that make up your website. Available controls may let you add pages, rename them, rearrange their order, or choose whether certain pages appear in the navigation.
You may also have the ability to delete pages. Be cautious: a deleted page may not be recoverable.
3
Settings
Settings contains broader website options, which may include basic search-engine information and other site-wide settings available for your account.
For help understanding search visibility, visit Google and SEO Basics.
4
Stats
The Stats area lets you review information about visits to your website and gives you a basic view of how your website is being found and used.
More customer-friendly analytics guidance is available in Website Leads and Statistics.
5
Preview
Preview lets you check how your website appears at different screen sizes. This is useful before you finish an editing session, especially after changing text, images, or page layouts.
6
Add New Section
As you move through your website, you may see an Add New Section option. Use it to choose an available content section and add new information to the page.
Existing sections can also be edited as you continue personalizing your website.
7
Log Out
When you are finished working in the editor, use Log Out to end your editing session. You will need to sign in again the next time you want to make changes.
Your website was prepared to be launch-ready, but you can continue personalizing and maintaining ordinary content as your business changes.
Leave technical website changes to support
Domain connections, DNS changes, unusual platform settings, custom code, and advanced integrations can affect whether your website works correctly. Those are not ordinary content edits.
If you are unsure whether a setting is safe to change, use the Website Technical Help resources before changing it.